> For the complete documentation index, see [llms.txt](https://learn.doubletick.io/llms.txt). Markdown versions of documentation pages are available by appending `.md` to page URLs; this page is available as [Markdown](https://learn.doubletick.io/settings/how-to-manage-channels.md).
# How to Manage Channels
Learn to manage your WhatsApp Business Account (WABA) on DoubleTick. Access details, manage agents, update profiles, and control WABA status for optimal performance.
In your DoubleTick dashboard, the "**Channels**" section serves as the central hub for managing your channels (formerly known as WABA — WhatsApp Business Account). Here, you can access vital information and perform various management tasks to optimize your channel's performance.
## Understanding Your Channel Details
Within the Channels section, you'll find a multiple information about your channel:
1. **Display Name**: This is the name associated with your channel, which is visible to your customers
2. **WABA Number**: Your unique WhatsApp Business API number
3. **Number of Agents**: Keep track of the total number of agents added to your channel for efficient team management
4. **Messaging Limit**: Insights into the messaging limit currently allotted to your account
5. Channel Creation Date: The date when your WhatsApp Business Account was created
6. Channel Status: An indication of whether your channel is currently active or inactive, ensuring real-time visibility into its operational status
Managing Your Channel
In addition to accessing details about your channel, the Channels section also offers robust management capabilities:
To view and manage data associated with the channel, click on the three dots icon located next to the channel
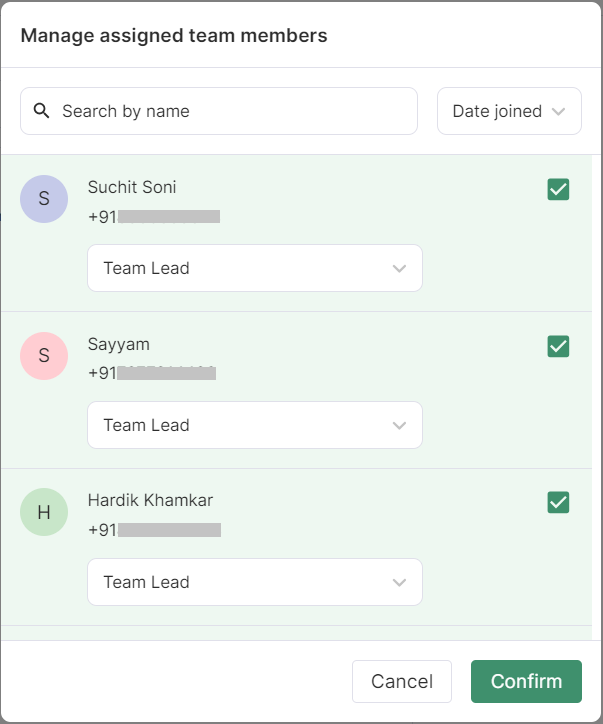
### Manage Assignee
* View a comprehensive list of all agents added to your channel
* Gain visibility into each agent's name and login number, facilitating easy identification and tracking of individual agents within the channel.
* Modify the role of an agent by selecting a new role from the dropdown menu associated with their name, ensuring role adjustments are accurately applied.
* You can also remove an agent from the channel by unchecking their name, streamlining the process of agent management
Click on the "Confirm" button to confirm and save the changes.
### Deactivate
Within this option, you have the ability to deactivate your channel, which may be necessary due to various reasons such as restrictions or the need to change the associated number. Once deactivated, you will not be able to utilize the channel until you reactivate the number
To deactivate a channel, follow these steps:
* Click on the three dots next to the channel
* Select "Deactivate"
* A confirmation pop-up will appear; click on the "Deactivate" button to confirm
* Upon completion, the channel status will change from active to inactive, indicating successful deactivation
Update Channel Profile
In the "Update Channel Profile" section, you can adjust various profile details including the
* Display Picture
* Vertical selection
* Channel Profile name
* Email
* Website
* Address
* About us section
* Description
---
# Agent Instructions
This documentation is published with GitBook. GitBook is the documentation platform designed so that both humans and AI agents can read, navigate, and reason over technical content effectively. Learn more at gitbook.com.
## Querying This Documentation
If you need additional information that is not directly available in this page, you can query the documentation by asking a question.
Perform an HTTP GET request on the following URL with the `ask` and `goal` query parameters:
```
GET https://learn.doubletick.io/settings/how-to-manage-channels.md?ask=&goal=
```
`ask` is the immediate question: it should be specific, self-contained, and written in natural language.
`goal` is what the user is ultimately trying to achieve, the reason they need the answer. Sharing it helps GitBook give you a better, more relevant answer. A goal is most helpful when it describes the outcome the user wants rather than restating the question. For example, with `ask=how do I create an API token`, a goal like `automate deployments from our CI pipeline` lets GitBook tailor the answer to that use case.
The response will contain a direct answer to the question and relevant excerpts and sources from the documentation.
Use this mechanism when the answer is not explicitly present in the current page, you need clarification or additional context, or you want to retrieve related documentation sections.




.gif?alt=media&token=af8de1a8-4730-4894-a8d2-61a35db6d59b)
.gif?alt=media&token=1246cabb-b194-4274-a982-222f79bdcb84)